Instructor
Guide to WHS
Class and Student Management
2. Using the “Upload a web Page” link.
D. Class Rolls: Types of Students,
Accepting Student Registrations
1. To admit students to a class
2. To remove students from a class
3. When a student changes sections
4. Spreadsheets of student rolls
E. Viewing summaries of student
homework results
F. Getting machine-graded homework
information into a spreadsheet
G. Recording and Retrieving hand-graded homework scores
H. The “Grades” button and the Grade Book
I. Instructor Downloads and Student
Uploads
J. Calculate, Show, and Download Summaries, Download Grades, Save Grades, and
Hand-Graded Homework
K. Student view of Grade Book Data
L. Assigning class privileges,
attributes, and membership
a. Bypassing Add/Drop to Directly
Add Members to Classes
M.
Announcements, “Student Impersonation”, and Feedback
Additional Tools
WHS Instructors create and manage WHS classes. The homework assignments in WHS classes are defined by WHS Homework Lists which are developed and published (in WHS) by WHS Instructors. WHS Instructors do their class development and management work on the WHS Class Management Page. Instructor-level permission is required for an account to access the class management page. It is initially accessed via the Instructor Tools link under Tools on the WHS Menu and is subsequently included in the class instructor’s (owner’s) menu.
A. Create a New Class
B.
Manage a Class
The instructor often needs to modify some aspect
of an extant class.
From the menu select Instructor Tools either from the Tools menu or from that for any class
owned by the instructor. Then select the class to be modified.
You can change any global
parameter of a class except the Class Id. In particular you can change the Class Name, School, Homework List,
and Class Home Page at any time.
2.
Using the “Upload a web Page” link
You can store and maintain class
(and other) web pages on the WHS server:
1. Create the web page and save it in a
convenient location. One of the simplest
ways to do this is to create the document in a word processor which exports web pages. Essentially all of them do. For instance the current document is
“InstructorGuideToWHS.doc”. We:
a. Save
the document in a new directory (folder).
The name of the document (without extension) is a good choice for the
folder name. Save it both as a Word document ( “*.doc”)
and as a web page (“.htm,*.html”).
b. Create a zip archive of the contents of the folder. In Windows this can be done by selecting the files, right clicking, and selecting “Send To” then “Zip Archive”.
c. Select “Upload a webpage”. In the Web Page Uploads and Downloads page enter the browse for the zip file click on “Insert” or “Upload”
If the upload is successful the file will appear in the WebPage Uploads and Downloads table with an Upload Id. If the html file in the zipfile is “file.htm” and the Upload Id is, say, “99” the URL for the web page is http://www.mathclass.org/WebPages/Pages/99/file.htm”.
If the page is to serve as a class
web page for a course then the complete URL should be entered at “Class Homepage” after the course is selected in the Class Management Page and Class Management is pressed. Note that
“Modify Class” must be pressed to actually install
the page.
d. To update a web page, click on Page
UP/Downloads in the Tools
menu, locate the page in the table on
the WebPage Uploads and Downloads page and click “Select” . Click on “Download” to download the zipfile,
open it, edit the page,
re-create the zipfile, press “Edit” to locate the new zipfile, then press “Update”
Top
C.
List Updates:
Note: There are three parameters (deadline, “teacher only”, and version)
set when “Modify
Assignment” is clicked on this page. Be sure that all
three are exactly what you want! Once
this page is used to override the list defaults for a class, all of the parameters for that
class must be maintained from this page from then on. There is no way to revert
to the original list
parameters.
Setting Deadlines:
The homework lists posted by materials authors typically have expiration
dates on the assignments which may or may not meet the needs of other
teachers. In the “List Updates” page instructors have the ability to override the
expiration dates set by the list author simply by selecting the assignment,
choosing the desired date and pressing “Modify
Assignment”.
NOTE: The ability of individual instructors to adjust expiration
dates has the potential to seriously conflict with the management of multi-section
courses using the same list.
In these cases the list is usually maintained by the course coordinator
who makes expiration date adjustments for the entire course. If one section has a later expiration date
than another then the students in the late-expiring section have an advantages
since they can browse the early expiring section and bring up their personal
version (with all of the answers) as a “Specific
Version” in the “early” class. Thus the
understanding must be that instructors of individual sections in multi-section
courses agree not to override the any assignment deadlines. In this context it should be noted that all
such changes are logged by the system.
Setting “Teacher Only” and Fixed Version
Assignments:
In previous versions of WHS, instructors
have been forced visibility and version
attributes set by the list author.
It is now possible for an instructor using a published list to tag list
items “Teacher only” (which means
that only accounts with instructor privileges can see the items). This will make it possible to effectively
omit items or to
make them available for specific time periods rather than continuously. It will not, however, be possible for an
instructor to override a list owner’s selection of “Teacher Only” for an item.
It is also possible now for instructors to fix a version number for an
item. This assigns every student the selected
version as his/her personal version and
makes it possible for a teacher
to duplicate and distribute one homework
assignment rather than forcing
individual students to print out individual copies.
Versions 0 and -2
cause the system to choose
personal versions dependent on the student account
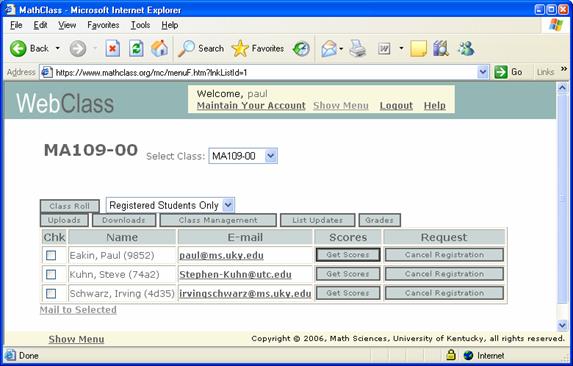
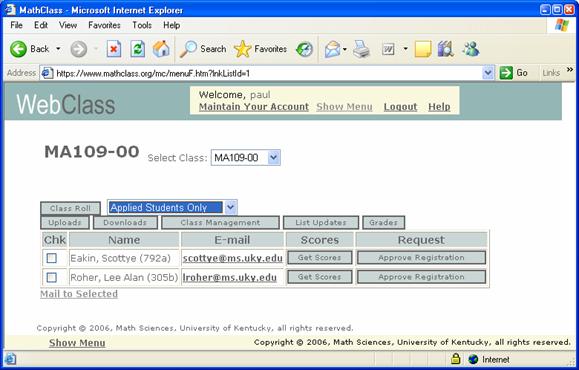
D. Class Rolls: Types of Students, Accepting Student Registrations
In WHS there are three types of student: “browsers” who are informal
auditors and interact only with the computer, “applied” students who have used
the WHS ADD/DROP to apply to the instructor for admission, and “registered”
students who are participating for credit.
Using the “Select
Account Type” selection box at the top of the class management page the
instructor can display tables of each
member type and with the tools on these pages can move “applied” students to
“registered” (thus accepting them in the
class) and visa versa.
1. To admit students to a class open the “Applied Students Only” Class Roll. There is a Request column at which the
instructor can, if he/she desires, press the “Approve Registration” button. This fully registers the
student in the class, enters his/her
name in the grade book, etc.
2. To remove students from a class open the “Registered Students Only” Class Roll. There is a Request column at which the instructor can, if he/she desires, press the “Cancel Registration” button. This shifts the student back to “applied” status.
Note: A registered
student cannot use the WHS Add/Drop to drop a class until the instructor has
cancelled his or her registration.
3.
When a student changes sections
The student guide gives the following instructions on changing
sections. The instructions are intended
to cover the (most common) scenario in which
a student changes from one section to another which uses the same
homework list. Work that the student
does (in WHS) for the old section will appear in the records for the new
provided the student uses the same account. The admonition to make sure the old
class is in the menu is the mechanism for making sure the accounts are the
same. In the past students have done part of their work in one account and part in another with
the instructor of record aware of only
one of them.
Student
Instructions on Changing Sections:
If you are registered in WHS
in one section of a multi-section course and wish to change
sections here is what must be done:
A. Use the university drop/add to
change sections.
B. Log in to WHS and make sure that the old section appears
on the menu. Go to Add/Drop and add the new
section. At this point you can begin to do the class homework in the new
section. The new section will recognize any work done in the old section
provided the old section appeared on the menu when you logged in and the
homework sets in the two sections are the same.
C. When you go to new class,
speak to the new instructor and
tell him/her that you have added the section, and ask that the
instructor approve your WHS registration for the class.
D. Inform the old instructor that you
have dropped the section and ask that you registration in the old section be
cancelled. This can be done by email
(see “I”) .
E. The old class will remain on you menu
even after the instructor cancels your registration. To remove it from your
menu you must drop the class in WHS Drop/Add.
The old class will appear in your “Drop Class” list only after the old instructor has
cancelled your registration in that section.
4. Spreadsheets of
student rolls
The “Class
Roll” button will produce an Excel
spreadsheet (actually a csv file) of the data
displayed in any of the tables opened via the “Select Account Type” menu.
E. Viewing summaries of student
homework results
Each table displayed via
the Select Account Type menu has a “Scores”
column which opens views of all of the student homework results. For a
particular student this is the same data that the student receives when he/she
presses “Homework Scores” on the main page.
See the Student
Guide to WHS (“G”) for more details on the
F.
Getting machine-graded homework information into
a spreadsheet
Class instructors can produce a
spreadsheet of
homework results for all students in the class for any given set of assignments as follows:
From the floating menu select the class and then “Web Homework”. Click on the “Homework
Scores” button. Select account “All’’
and table “Homework Summary” then click the check box to the left of each
homework assignment of interest. Click
on “Calculate Percentages” and then
on “Download Summary”
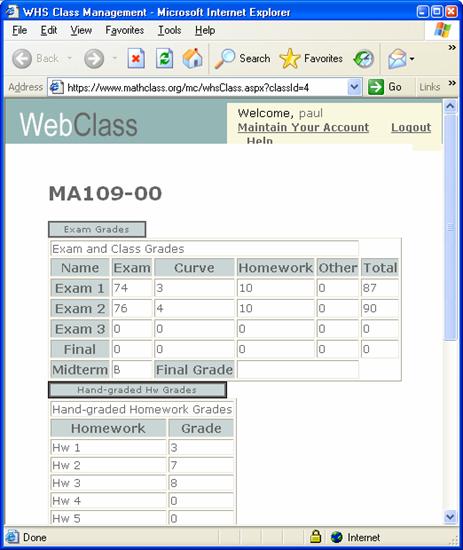
G. Recording and Retrieving hand-graded homework scores
The table of hand-graded scores
is displayed using the “Hand-graded
Homework Grades”
button on the “Grades” Table which
is on the “Instructor Tools” page for the class. See “J”
Top
H. The “Grades” button and the Grade Book:
WHS has a basic grade book which is intended to support a
general, multi-section, college course with three midterm exams and a final
(Ex1,Ex2, Ex3, Final) , a homework grade for each exam (Hw1,Hw2,
Hw3,Hw4), and a “general” or “generic”
grade for each exam G1,G2,G3,G4). The “G” grade is generally used to account
for quizzes, class
participation, reports, etc. There is a
provision for a “curve” for each exam and a place for the instructor to enter
Midterm and Final grades.
The grade book has a row for each registered student. It frequently happens that a student has only
“Applied” or even “Browsing” status in a course. The “Select
Account Type” pull-down
menu at the top of the page can be used to check the status of all students in
the class. If a student doesn’t appear under “Registered
Students Only” then he/she will not appear in the grade book. In such cases
the student may be in the “Applied”
list and can be registered there.
Although there are tables of
homework scores for each student there is no provision for
automatically inserting the homework scores into the grade book. This is
because the homework “grade” score is likely to be some function of the
homework scores. All the system can do is provide the
data in a form that the instructor can manipulate.
The instructor opens the grade book with the “Grades” button and enters scores in each of the categories.
I.
Instructor Downloads and Student Uploads
The “Uploads” and “Downloads” buttons at the top of the
page serve to manage files that are uploaded by students and downloaded by the instructor. Students upload files to the instructor by
selecting “File Upload” from
their class homework assignment menu (at the bottom), browsing for
the file
and pressing the “Upload”
button. When the instructor uploads a file using
the Downloads table it appears in the student’s homework menu (after the machine graded
assignments) where students can select and download them. When dealing with
uploads in WHS remember that
IN WHS ALL UPLOADED
FILES ARE ZIP ARCHIVES!.
Thus if a student or instructor wants to upload a file, say “sam.pdf” or “joe.doc” then he or she must first create a zip archive containing the file (e.g. “sam.zip” which contains “sam.pdf “ or “joe.zip” which contains “joe.doc”). The zipfile is what is uploaded.
The instructor manages the student uploads from the Uploads table.
J.
Calculate, Show, and Download Summaries, Download Grades, Save
Grades, and Hand-Graded Homework
There following indicates the roles of the buttons at the bottom of the Instructor Tools -> Grades
page.
K. Student view of Grade Book Data
Registered students in the class can
press “Class Roll and Grades” on the main WHS page and view all of their
information in the grade book
L. Assigning class privileges, attributes, and membership
Instructors often have assistants
to do things like read and respond to feedback messages and assist in checking hand-graded
homework. The instructor may need to
identify special needs students to be sure their needed accommodations offered
or the instructor may want to note students who have checked out class
materials. If the class is part of a
research project there are times when records must be kept of certain
participant attributes such as whether they have consented to have their course
results included in the project data.
A very common course management situation occurs when an instructor of a large
lecture section wants to divide the class into recitation sections, each
handled by a teaching assistant. The instructor wants the assistants to individually manage
the feedback, grade books, etc. for their own sections but
needs to exercise oversight which requires instructor-level access to their
classes. One way to do this is for the
instructor to share the assistants’ account passwords but the latter may need
to use the same account for other, unrelated courses or activities. The tools for managing efforts like these are
on the course Members Page.
The Members Page is a very
general object with a number of capabilities not usually required for class
instruction. Here we concentrate on its
use for managing a few common situations. The main thing to know is that every
member of a class has,
at any one time, a State
and some Roles.
The State is a “word” which is empty or
made up of the letters C,R,A,I, and D. Only C,R, and D are important for ordinary classes.
C = “Certified” which translates as “Applied” for registration in the class
R = “Registered”
D = “Deleted”
The empty string = “Browsing”
The “A” (active), and “I” (Institutional Review Board/IRB) are used to manage other types of activities.
There are a large number of Roles
possible but for addressing most
class-related issues the role is a “word” of in the characters h,H,f,F, and O.
h
= homework reader. The class member can
view the homework scores and summaries of all members of the class. This is a common teaching assistant role.
H = homework writer. The class member can “impersonate” any member
of the class and submit homework answers and feedback is if he/she were that person. This is often used by the instructor when a
student reports difficulties with his or her account. It can happen that one
version of a
problem is ambiguous, has multiple correct answers, or is even incorrect and that this may appear on a particular
student’s personal version but not on the instructor’s or the common. This makes it possible for the instructor to
see exactly what the student sees and, when warranted, to insert the expected
answer so that the student gets credit. If
a class member has
this role then whenever he/she goes to the Web Homework page for the class the
selection box menu which normally has the member’s name as a single choice will
now have all registered members of the class. The instructor has this role by default. See
“M”
f = feedback reader. The class member can read all of the feedback messages submitted by members of the class. This is a common teaching assistant role. See “M”
F = Feedback Writer. The class member can read and respond to feedback messages from any person in the class. This is a common teaching assistant role. See “M”
O = owner. The class member has the ability to assign roles and status to anyone in the class. The exception is that the instructor can remove this member’s owner status the member cannot revoke the instructor’s owner status.
a.
Bypassing Add/Drop to Directly Add Members to Classes
Instructors can add members to classes. All that is required is that the individual have a WHS account. As noted above this is particularly useful for setting up large lecture or multi-section courses where faculty supervision is required. “Students” added this way tend to be teaching assistants, graders, etc. Generally it is recommended that instructors not routinely add students this way. It is generally much simpler for the student to use add/drop and the instructor approve the student’s registration on the class management page.
M. Announcements, “Student Impersonation”, and Feedback
The instructor account has control of the Announcements window on the main WHS page. Announcements are brief messages of the type one might write in a corner of the blackboard at the beginning or end of class. The announcements screen is a good place to let people know that a calculator was left in the classroom last time and where the owner can claim it.
The Student selection box menu lists all registered students in the class. The instructor can select a student name and, as far as the system is concerned, become that student. In particular the instructor can see whatever the student sees and any answers that the instructor submits will be treated as if the student had submitted them. The instructor can assign this role to another member of the class. (See “L”, the “H” role)
The Feedback Messages button opens a page which
organized all student homework queries and provides tools for the instructor to respond. The button contains an integer which
indicates the number of rows in the table on the page. Each entry in the table
is a question a waiting response. They
appear with the most recent at the top. A selection box under the table
contains the questions that have been answered.
Students see a dual of the instructor’s display. Their table contains the questions for which
there is a response and the selection box lists the questions that have been
answered. An individual student’s
feedback page contains only that student’s questions. Questions drop off the page after a fixed
time interval. The default is 14 days.
The instructor can change the parameter at the ‘Show Activity Settings” button on the class members page.
The instructor can assign to a member of the class the ability to read student feedback
questions (See “L”, the “h” role) and the ability to write
responses (See “L”, the “H” role).
Top
Additional Tools
There are other, powerful tools available to WHS users via the Tools menu.
“Page Up/Downloads” gives the user the ability to create and display web pages from the WHS site.
Installing WHS Web Pages
The “Menu List Editor” allows instructors to almost arbitrarily extend the class “floating” menu.
Editing the Class Menu
The “User Directory” provides account information from the last name, email, or userId.
The User Directory
Paul Eakin
August 19, 2006