WHS:
The University of Kentucky
Web Homework System
Acquiring and Getting Started With
Your WHS Student Account
Registration in Class At Other Schools
Registration in Multiple Classes
Creating a Class Your WHS Teacher Account
Routine Deletion of Classes by the
System
Changing the Class Announcement
Teacher Passwords Cannot Be Changed by other Teachers.
Student Records: A Primitive
Grade Book
Accessing Student Homework Records
WHS Author and Coordinator Usage
Installing a Homework Set on WHS
Removing a Homework from a List
A Tutorial Introduction to WHS
Materials Authoring
A Simple Problem Set on Solving Quadratic Equations
Posting the Formatted Document
Revising the Document: The Edit Cycle
More Details on WHS Formatting
The initial and global header sections
( H_ )
Problems Requiring Answers: ( QM_ )
b. Function and Integral
Answers:
AF_[size;var;numpts;lorange,hirange]
c. Integral Answers: AI_[size;var;numpts;lorange;hirange]
d. Selection Answers: AS_[choice_1;choice_2;…;choice_n]
e. Multiple Choice Answers: AL_[label_1;label_2;…;label_n] and
AR_[index]
g. Checkbox Answers: AB_[label_1;label_2;…;label_n;None of These]
i. Tabular answers: AT_[ansbxsize;m;n;t11;t12;…..;tmn]
Multiple Answer Formats in the Same Problem
Problems Not Requiring
Answers: ( QN_ )
Problems For Which There is No
Single Answer ( QN_[] )
Suppression of Correct Answer Return:
QM_N[]
WHS
is a web-based instructional support system operated in the public interest by
the University of Kentucky Department of Mathematics and The University of
Kentucky Information Systems. Its
primary functions are the distribution of supplemental instructional materials
such as web pages and streaming video, and the hosting of sets of homework
assignments. It was developed and is employed solely to assist traditional classroom instruction by conserving
teacher time through automation
of routine tasks, and the facilitation
of communication and collaboration.
There
are three main categories of WHS users: students, teachers, and authors. Anyone
can become a student simply by registering as a new user. Students participate
in classes created and managed by teachers using materials created by authors.
“Real” teachers at non-profit public and private institutions (all levels) can
become teachers and authors on WHS. There are no charges for the accounts or
for system usage for non-commercial educational or public service functions.
Note
on Browsers: Some features of mathclass.com depend on
modern browsers such as Netscape 6.0 or
higher and Internet Explorer 5.1 or higher.
Users of older browsers may find
that some buttons do not work. For the
most part these are shortcuts and the basic functionality will be available.
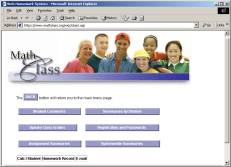
WHS Student Usage
Acquiring
and Getting Started With Your WHS Student Account
Use of WHS requires an account. You may already have an account by virtue of
your registration for certain classes or you may need to create your own account. In either case the first step is to select the “Web Homework” link on
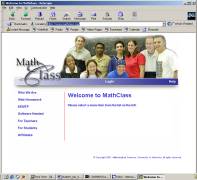
the mathclass.com main page. You will be presented with
a login screen
Case 1. You don’t have an account
or are not sure whether you have an account.

There are a number of items which may need clarification.
The email address is very important. If you do not have one then you should get one (e.g. from
hotmail.com) and use it. For immediate purpose of registration you can use a fake email address. For instance if Mary M. Mullins is a student at Ludwig Beethoven High School she
might use
Mary_M_Mullins@ludwig_beethoven.k12.ky.us which is highly unlikely to be
in use by any other student with a WHS account. DO NOT USE SOMEONE ELSE’S
EMAIL ADDRESS since (1) email sent to you by the system will be
directed to that address and (2) your email address becomes your login.
If there are no problems with your student number or
email your account will be created immediately with your email address as
login and your social security (or student) number as password.
If the system tells you that someone else already
has an account with that email or student number then that person is almost certainly you. Most likely an account was
created for you by virtue of your pre-registration in a class. Such accounts
will have your student number as both the login and password. Go to case 2, below, and attempt to log in
with your student number as both login id and password. If you are not able to log in this way then
send a help message by pressing the “Help” button on the bar below the picture
on the login screen. It may have happened that someone accidentally entered
your social security number or email.
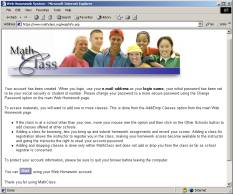
The “start” button at the bottom will take you to
the main WHS screen..
Case
2. You already have an account
(including when you have just been through case 1).
Lifetime of a Student Account
To get Started
In order to participate in WHS as a student you must
register for at least one class.
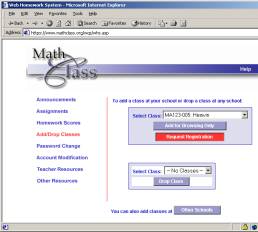
Adding and Dropping Classes
If you request registration in a course then:
If the teacher subsequently admits you then all of your results, including results on assignments done before the teacher admits you, will be presented to the teacher.
You should
not casually request registration for a class since any teacher of a class for
which a student is registered can change the password of that student. This feature of the system is there to
guards against forgotten student passwords and to prevent students who are not
serious from draining teacher time and system resources.
Registration in Class At Other Schools
Registration in Multiple Classes
You can register in any number of classes at any number
of achools for browsing or registration.
Dropping a Class
Class Announcements
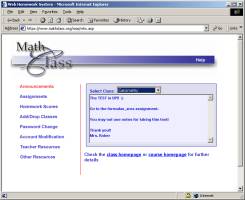
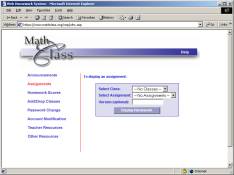
Assignments
Students participate in WHS classes by working on
assignments and communicating with the teacher.
Working an Assignment
In the most common format the
evaluation page contains:
Checking Homework Results
There are two types of information displayed:
Selecting a link in one of these tables results in the problem to which it
corresponds being displayed in a separate browser window.
Note: For assignments such as practice examinations in which there are
many variants on an assignment the links do not correspond to the precise
problem but rather to one near it according to the scheme by which the tests
are generated from a pool of problems.
Changing Account Information
Changing Passwords: You
can change your password at any time at the “Change Password” bar. You should quickly change your password from
the initial one to something more secure.
If you lose your password then any teacher in whose class you are
registered can create a new password for you. The teacher (nor anyone else) can recover the exact password that was
lost.
Changing Other Account Information: The “modify account” bar on
the main screen can be used to re-access the original registration screen and
to change any of the information (e.g.
email, school, student number, etc.)
used to create the user’s account.
The email is the most frequently changed of these as many people change
their email addresses. When you change
your email your new email automatically becomes your new login.
WHS Teacher Usage
Teacher
access and use of WHS is an extension of WHS student access and usage. See the Student Usage guide for general account
creation and modification information.
In
WHS teachers create and manage classes. Classes are created in the Class
Management page
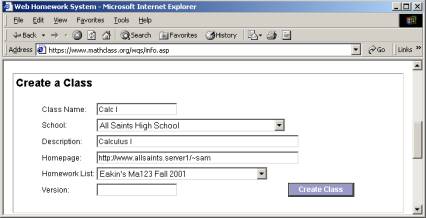
Creating a Class Your WHS Teacher Account
A class has the following attributes:
- The name of the class
This is the name which is displayed on, for instance, the assignment screen when students go to the system to do their homework. It should be descriptive but not too long.
- The school at which the class is listed or “taught”
This is selected at the menu in the “Create Class” area of the Class Management screen. Any teacher in the WHS system can create a class at any school in the system. This is primarily a mechanism to accommodate teachers who work at more than one school.
- The (optional) class homepage
Many teachers already maintain web pages or want to refer students to other resources. This provides convenient mechanism to direct students to such resources.
NOTE: The Class Homepage listing must be the complete URL for the page including the “http://”
- The homework list
The homework list references a collection of class materials (almost always a collection of individual homework assignments) which has been assembled by a coordinator from the individual resources or “homeworks” created for the system by authors. Since basic teacher accounts do not carry coordinator/author privileges holders of these accounts must select an extant list from those publicly available. These are listed in the “Homework List” menu in the Class Creation area. Unless the teacher knows precisely which homework list he/she wants, however, it is usually difficult to know what the items in the menu represent. However the most common interest is in a list that is already associated with a class that is on the system. There is a straightforward way to identify the list associated with any class at any school.
Identifying the Homework list Associated with a WHS Class.
Go to the Add/Drop Classes link at the main page and select Other Schools. Select the school at which the class is listed, check the “Include Course List Names” box, and press the Submit bar.

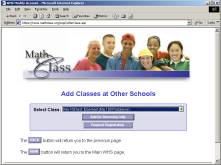
The Select Class menu contains all classes at the school with the homework list associated with the class contained in parentheses. Thus as indicated above “Ma109 Problems” is the homework list for the University of Kentucky “Ma109test” class which is taught by the teacher “Eberhart”
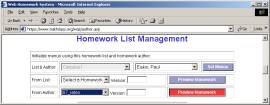
Browsing the Contents of Lists
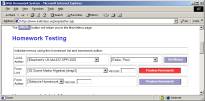
Teachers can browse the contents of all lists whether or not they are assigned to classes ( including private ones) by going to the Teacher Resources link on the main page and selecting Authoring Tools. Although most of the tools on this page require authoring privileges the Homework Testing area is open to teacher accounts. One simply selects a list in the list menu of the Homework Testing area and presses “Set Menus”. It is not necessary to select the author of the list. Then at the “From List” menu select a homework to be inspected and press the “Preview Homework” bar on the same line.
The ability of teachers to inspect and test the contents of lists provides a mechanism for one or more teachers to work with a coordinator in the development of a list. This is particularly useful for multi-section courses as it permits the coordinator to make changes in the course list available to the course teachers by first making the changes in private edition of the course list,.
The (optional) version
number of a list:
The version number is a floating point of
up to 9 digits which is between 0 and 1. The system will create a version of an assignment for each number
specified. Conversely, if there is more
than one version of an assignment possible the system will assign a version
number to each variant.
If a version number is specified when creating a class then that version of each homework on the
list will be presented to each student .
If there is only one version then that one will be given regardless of
whether a number is specified or not.
This option is most commonly
used for classes that are created with
a list that contains a single diagnostic instrument, placement exam, survey,
or such for which there are
multiple possible forms but for which an individual teacher wants his/her
students all to complete the same one.
The following submission would create a class called
“Calc I” at All Saints High School, using Eakin’s Ma123 Fall 2001 homework list
from the University of Kentucky with class homepage http://www,allsaints.server1/~sam. Note the full URL for the home page, including the “http”//”.
Deleting Classes
Routine Deletion of Classes by the System
Adding Your Own Class
Modifying a Class
Changing the Class Announcement
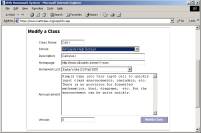
Managing Classes
Registration and Passwords
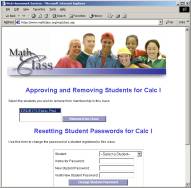
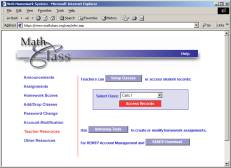
Changing Student Passwords
Teacher Passwords Cannot Be Changed by other Teachers.
Teachers cannot change the passwords on teacher accounts. This makes it possible for
one teacher to register for another’s class without fear of losing control of
his/her account. This also means that
there is no simple recovery mechanism for teachers. Teacher accounts for which
passwords are lost can be re-activated only by the system administration. The best protection against a lost password
is to write the password down in a convenient place at home in such a
manner that it is not identified as the password of an account. A document
such as the notes page of a phone book (on which there are a number of
other words, messages, notes,
numbers. etc.) is a good choice.
Student Records: A Primitive Grade Book
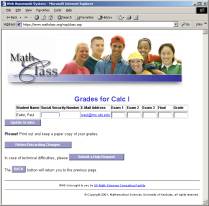
Student Comments
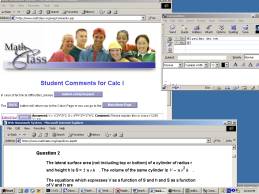
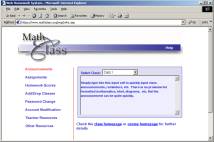
Accessing Student Homework Records
There are three bars on the records page which
provide records of student homework.
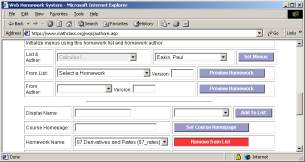
WHS Author and Coordinator Usage
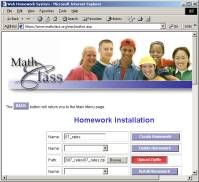
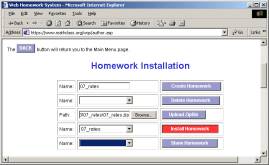
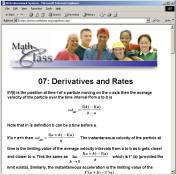
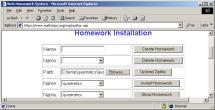
Installing a Homework Set on WHS
The details of
the construction of a homework can be found in the draft text Communicating Mathematics . We assume here that an Author
has created the homework
“07_rates” which is to be the seventh assignment in a calculus class and
wants to install it on the WHS server and has also created the zipfile “07_rates.zip”. At this point one uses the
Homework Installation area of the Authoring Tools page.

Homework List Management
Homework Lists are
created by Coordinators. While not necessarily the case Authors
are usually Coordinators and visa versa. Homework Lists can (and frequently do) contain homeworks created by multiple
authors. To be able to do this Coordinators
are able to access and inspect
the homeworks of all Authors.
Creating a List
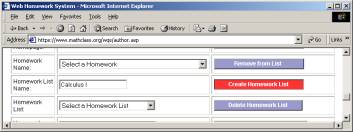
Selecting the homework from the menu on the right
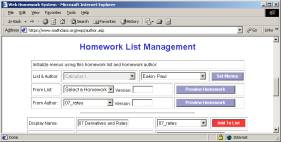
Removing a Homework from a List
Removing A List
A Tutorial
Introduction to
WHS Materials Authoring
WHS
materials take the form of lists of
problems or questions with interspersed text.
The
process of “posting” resources
to the WHS system is best viewed as consisting of a sequence of four distinct processes: design, formatting, posting, and revision.
Design is by far the most difficult as it contains most of the creative
effort. In this component one creates
the layout of the resource and creates
a draft containing complete statements and solutions/answers to all of its problems and questions it. Emphasis in creating the draft is on
the general layout of the document, the
approximate wording of the problems and questions, and the carefully
written out, mathematically rigorous solutions to all problems. In the latter careful attention should be
paid to crafting the most general solution possible with approximations such
as floating point results from
calculators introduced as late as possible (if at all).
Although
in practice much of the concept
document is created at the keyboard it
is best done with pencil and paper in a completely traditional form with as
little reference to technology as possible.
Formatting
is the
process of deriving a WHS source document for the resource from the conceptual
draft. Source documents are prepared
using commercial word processors and computer algebra systems. For the most part formatting involves
presenting the draft document in
electronic form with the inclusion
of formatting tags (control lines)
which inform the WHS system of the
beginnings of problems, specify answers
and their format, indicate material to be ignored, etc. At this time documents on the system are
prepared in Microsoft Word 2000 (with the Microsoft Office Html Filter 2.0
which is downloadable from Microsoft), Microsoft Word 2002 (which contains the
filter), and Maple 6 and Maple 7.
It
is important to remember that the
objective of the formatting step is to create an initial source document which the WHS system can display.
The first version of a resource is almost always preliminary with
corrections, improvements in
presentation, inclusion of diagrams, etc. done through several repetitions of the revision and posting steps which follow.
Posting
to WHS is a purely formal process of communicating the source material and
presentation instructions to the WHS server.
Revision is the iterative process of revising and re-posting the source
document until we are satisfied that the resulting resource is completely free
of errors and meets our instructional objectives. At one extreme revision can
be a very quick and simple check that spelling, mathematics, and performance
are acceptable while at the other it can include a substantial amount of
enhancement such as adding functionality, including or upgrading diagrams, etc.
A Simple Problem Set on Solving Quadratic Equations
Suppose,
as a concrete example, that we are teaching an elementary algebra course and
want to develop and post on WHS a three-problem homework set on solving quadratic equations. The types of problems, their order, and their level of difficulty, and the
notation will probably be suggested by the examples and problems in the course
text or supplements. For instance from those sources we might decide that we
want: (1) a problem on completing the
square, (2) a problem on applying the
quadratic formula, and (3) a simple application. One might even decide that he or she would like to have problems
somewhat analogous to certain examples in the book. For instance perhaps
the course text or another available book contains a problem asking for
the points of intersection of a line and a circle or has a “story problem”
which involves finding the points of intersection of two circles. It is quite appropriate to use such general
characterizations of problems as points
of departure for your own. At the other
extreme it is, for a number of reasons,
a very bad idea to simply copy problems from other sources.
Copying
published material will almost certainly violate the publisher’s
copyright. Materials posted on WHS are
accessible to anyone over the internet and hence are not protected by the “fair use” provisions of copyright law
While
commercial textbook publishers will often grant permission to use material
derived from a text you have adopted this permission is typically withdrawn if
the adoption is no longer in effect. If
this happens one can lose a very large investment in materials preparation.
Permission
granted you to adapt copyrighted material would almost certainly not be
transferable to others. This would almost certainly prevent your sharing your
efforts with others and would hold any prospects for publishing your work
hostage to the copyright holder even if
the percentage of such material were miniscule.
It
is important to realize that copyright protects the way the author has
organized a collection of ideas regardless of the manner in which the work is
presented. This protection extends to “derived
works”. Thus converting printed material to web format is covered by
copyright just as translating it into a foreign language is protected. Moreover
the presentation of solutions to problems in a book is known to fall under the
derived works provisions.
With
these admonitions one must admit that the creation of a really new elementary
mathematics is a very, very rare event. Virtually all problems in texts were
derived from problems in previous texts which were themselves “borrowed” from
earlier sources. Authors in general contribute
the selection, organization, and notation. If a mathematics student or
teachers sets about writing down a collection of problems related to a given
topic (e.g. quadratic equations) it is highly likely that a close approximation
to every one of them will exist in a number of texts. However it would be
highly unlikely that the same order, wording, or mathematical notation would
occur elsewhere. Thus as a matter of
principle one can safely expect to avoid copyright conflicts if one uses other
sources only for general inspiration and direction while carefully “making up”
his or her own problems and expressing them in his or her own words.
Finally, we should not omit the sense of accomplishment involved in creating an original resource to support the teaching and understanding of a mathematical idea. At its highest level this is a very pure form of communication of one’s understanding and love of (or passion for) mathematics and desire to share it with others in the form of an experience. To the extent that the vision and words expression it are not our own that feeling of satisfaction is greatly diminished.
Design of the Draft Document
The
following is a possible design draft of
a simple exercise set on quadratic equations. Its objective is to
establish the form of the document with
complete (though perhaps rough)
versions of the text and complete, correct solutions or answers to all problems
and questions. Although the version
below is formatted draft documents (or portions of them) may be typed with
mathematics in calculator syntax or by hand.
Writing the general document on a word processor (or Maple) using
calculator syntax for mathematics and then filling in solutions and diagrams by
hand is common and efficient.
Title: Solving Quadratics
Problem 1
If ![]() is written in the form
is written in the form ![]() then
then
a = ____,
b = ____,
and
c = _____.
Solution
![]() =
= ![]()
a = 3
b = -5/6
c = 95/12
Problem 2
If x is a
positive number such that ![]() then x = ___________.
then x = ___________.
Solution:
X = ![]()
The positive choice is “+” so x = ![]()
Problem 3.
A rectangle has an area of 24 square feet and its
length is 10 feet greater than its width. What are the dimensions of the
rectangle?
Solution:
In the diagram x must be positive.
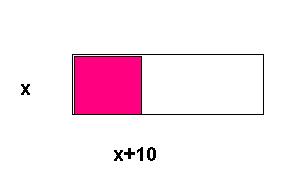
x*(x+10) = 24
x^2+10*x-24=0
(x-2)*(x+12) = 0
x = 2, x = -12
As
mentioned earlier the above would typically be sketched by hand. The important
features are that we have identified the material to be presented, rendered it
in draft form, and carefully solved the problem and written out the correct
answer. In general we avoid using calculators even though we may ultimately
allow students to present floating point answers In that case we will need to specify a level of accuracy
which should be referred to the absolutely correct answer (if possible) rather
than another approximation.
Form of the Draft Document
Formatting is the process of producing
a WHS source from the original
draft.
A
WHS source document is a Word,
Maple, or other conventional or mathematical text processing system file. In WHS all development, edits, changes, etc.
are done in the source document and the entire WHS resource is generated (or
re-generated) from that source. This greatly simplifies the maintenance and
sharing of materials and makes it possible to maintain compatibility or as WHS
changes.
Formatting Tags
The author of a WHS document describes
both the content and the manner in which the WHS system will present it and
handle reactions to it through a small number of formatting tags.
These tags tell WHS how to
derive the homework from the source
Formatting
tags have the form “TEXT_”
or “TEXT_[PARAMETER LIST].”
Since these forms can occur in the body of documents there are several
conventions governing their placement:
in
order for a tag to be recognized as a
formatting tag by the WHS system it must be the first expression on a line. A line containing a
formatting tag is called a tag line or
equivalently a control line . There are two general
facts about tags that must be remembered lest one arrive at unexpected results.
- Tags must begin the
control line they define.
- all information
following the tag on a tag line is ignored by the WHS system
- any two tag lines must
always be separated by a non-tag line (which may be blank).
Sections
The
major components of a WHS document are called sections. Sections are
blocks of the source document delimited
by tag lines. A section is
initiated by a control line and terminated by the next one in the document.
Sections
may be text, problems, answers, or
material such as descriptive comments which is to be ignored by the
system. Sections which are to be
ignored are begun by the “SKIP_” tag.
Every
WHS document must contain a global header section which is delimited (in its simplest form)
by an “H_” tag. All information before
the global header tag is ignored.
Global header sections are typically used for titles, instructions, introductions, etc.
The
simplest of all WHS documents would be the following:
H_
SKIP_
This
would display a single blank line. Technically, the “SKIP_” line could be omitted. However as a matter
of practice it is always a good idea
end text sections with a SKIP_ . This
prevents extraneous document “scaffolding” and comments from being displayed
and provides more control over the source document. For instance it is often
convenient to add some white space between major sections of a document for
readability. Without the terminating “SKIP_”
such space would be incorporated into the displayed document.
Question Tags
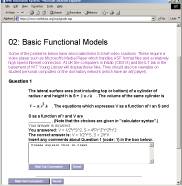
Most questions in WHS are initiated by a “QM_[ ]” tag. The brackets in the tag accept a semicolon-delimited argument of which the first entry is the precision expected of all responses. The precision is followed by the correct answers which students will enter or select. For instance the control line “QM_[.01;sin(x);sqrt(2)]” instructs the system that a problem is to follow for which the response to the first component is “sin(x)” and that to the second is “sqrt(2)”. The precision, “.01” says that if the answer-type is of a form for which the student response in entered in calculator syntax then the entered expression must agree with the stated correct answer to within .01. In the case of the “sin(x)” response this says that for each x within a randomly selected range the value of sin(x) must differ in absolute value from the corresponding value of the answer expression to within .01. In the case of the sqrt(2) response it says that the absolute value of sqrt(2) minus the student response must be at most .01.
IMPORTANT: In the current WHS tags cannot contain any
formatted material !
For
instance, the tag
“QM_[.01;sin(x);sqrt(2)]” given above cannot be presented to the WHS
server as “QM_[.01;sin(x); ![]() ]”
. A source document containing this tag
line would evoke a blank posting.
]”
. A source document containing this tag
line would evoke a blank posting.
Answer Tags
The
type of answer expected is governed by the choice of answer tag. There are a number of answer forms. The two simplest
are the character answer,
“AC_[]”, tag and the listbox
“AS_[]” tag. The argument for
the “AC_” tag is the width, in characters,
of the answer box into which the student will enter his/her response.
Thus “AC_[10]” creates a text box entry line 10 characters wide. The
argument to the “AS_[]” tag is a semicolon-separated sequence of alternative choices. When the system
encounters this tag it creates a listbox or “pull-down list” from which any of
the choices in the argument may be selected.
With this brief introduction we can create a formatted document (created in Maple) based on our rough draft.
H_
Solving Quadratics
SKIP_
problem 1 (Note this line will not post. Problem
numbers are added by the system – this
“problem 1” label helps locate the source for problem 1 in the source
document if it has to be edited).
QM_[0;3;-5/6;95/12]
If ![]() is written in the form
is written in the form ![]() then
then
a =
AC_[5]
b =
AC_[5]
,
and c =
AC_[10]
.
SKIP_
prob 1 calculations
(note that this will not appear in the posted homework since it is in a section
initiated by a skip tag.
> 3*( (x+5/6)^2) + 3*(10/3 - (5/6)^2);
![]()
>
Problem
2
QM_[.001;3/2+sqrt(57)/2]
If
x is a positive number such that ![]() then x =
then x =
AC_[10]
SKIP
prob2 calculations
question asks for the positve root
> solve(x^2-3*x-12 =0,x);
![]()
>
>
Problem 3.
QM_[0;2;10]
A
rectangle has an area of 24 square feet and its length is 10 feet greater than
its width. What are the dimensions of the rectangle?
Width
=
AS_[1;2;3;4;5;6;7;8;10;12;24]
Length
=
AS_[1;2;3;4;5;6;7;8;10;12;24]
.
SKIP_
width
is positive solution
>
solve(x*(x+10)=24,x);
![]()
height = 2+10 = 12
Posting the Formatted Document
Once we have properly formatted source document “posting” the resource to WHS is straightforward and mechanical. Here we demonstrate the process on the Maple worksheet developed in the previous section. The recommended steps in posting are as follows:
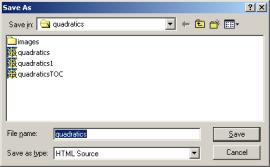
1. Decide on a name for the resource and save the source document under the chosen name in a directory (folder) with the chosen name. The directory will be called the source directory. In general it is good practice to use lower case letters for the name as WHS is case-insensitive to resource names. Since our resource involves quadratics equations we choose the name “quadratics” for the resource. We:
2. Create a directory called “quadratics”, and Save the worksheet as “quadratics” in the “quadratics” directory.
3.
Export the worksheet in html format into the
source directory using the same name ,
using frames, and selecting
“gif” image format. The default choice of “images” for the location of the
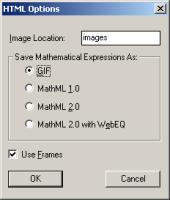
images is a good choice. If the document has previously been saved as html in
this directory then the software will ask if one really intends to replace what is already there. Respond “yes” and “yes to all” as asked.
- Create a zip archive of
the contents of the source
directory, giving the chosen resource name to the archive. There are numerous free, shareware, and
commercial applications for
creating zip archives. The free “zip.exe” which
can be found via a web search can be used in a command window in MS Windows as follows.
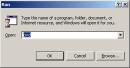
- Open a command shell at
“Run” on the “Start” menu and
change to the source directory for the resource using the “cd” command
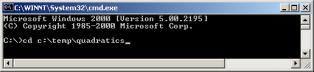
- Check to see if zip is in the path by entering zip -? at the prompt. If it is not
found add it to the path or simply copy zip.exe into the source directory using the windows explorer.
- Execute the command
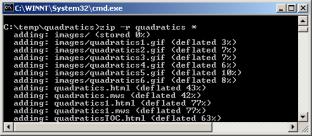
: zip –r quadratics *
Note the “r” (recursive) is critical, as is the use of the precise resource name, as is the asterisk (*) which tells the application to include all of the files in the directory.
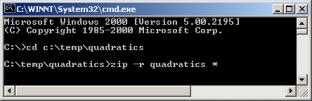
One should see files listed as they are added to the archive
.
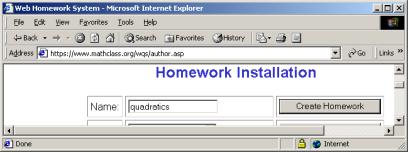
- Connect to www
mathclass.com and log in. At this point you must have an author account on
the system. Select Authoring Tools at the Teacher Resources link on the main WHS page.In the Homework
Installation area on the Authoring
Tools screen enter the name of the resource on the “Create Homework” line and press the “Create
Homework” bar.
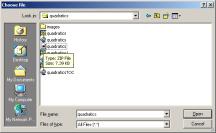
- Press the “Browse”
button and select the zip file in the source directory.
- Press “Upload Zipfile” and upon
receiving notice that this has been done select the resource at the “Install Homework” line
and press “Install Homework”.
Upon receiving notice that the homework has been successfully
installed, select the resource at
the “Show Homework” line and press
the “Show Homework” bar to view the results.
- When processed and
posted by WHS the above “quadratics” document produces the following
display at the “Show Homework” bar.
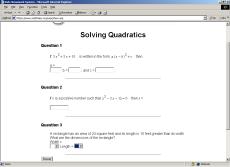
While
certainly not satisfactory this (or some equivalent) is the hoped-for outcome
of the posting process: a source document from which we can successfully post on WHS a resource which
can then be edited to an acceptable final form. The reader will note, for instance, that we have not included the diagram in the third problem.
Indeed at this stage in the process we are content to have a posted document
which we can inspect and improve one aspect at a time. This is the revision
component.
Revising the Document: The Edit Cycle
Although
it happens a resource that does not require revisions is a very rare item. Our example will be revised and expanded a
number of times in subsequent sessions.
The process , called the edit cycle
amounts simply to making indicated changes to the source document and then
repeating the posting operation. To someone who has posted but a few documents
this might at first appear to be a large amount of work. However the limiting
factor quickly becomes the speed of the author’s internet connection. The “Posting” routine described above should
seldom take more than a minute or two.
Initial Edits
If
one has a fast connection a simple set of edits can be completed in less than a
minute. For instance one obvious
shortcoming of the current “quadratics” resource is
the failure of the answer boxes to remain inline. The “broken line” appearance is result of
the necessity of placing tags on separate lines and the fact that WHS ignores
everything on a tag line (other than the tag itself). In order to place the first answer control line in question 1 we placed a <return> immediately
after the “a =”, which the system duly printed. The reason that breaks don’t
occur before “b =” and “c = “ is that
the <return>’s on the tag lines that preceded them were
ignored. We need a means to tell WHS to ignore certain
<return>’s terminating lines
which precede control lines. This is the function of the “AH_” tag. When encountered this tag instructs WHS to
ignore the <return> immediately before the next control line. Thus if we
modify problem 1 above to change from:
QM_[0;3;-5/6;95/12]
If ![]() is written in the form
is written in the form ![]() then
then
a =
AC_[5]
b =
AC_[5]
, and c =
AC_[10]
.
SKIP_
To
QM_[0;3;-5/6;95/12]
AH_
If ![]() is written in the form
is written in the form ![]() then
then
a =
AC_[5]
b =
AC_[5]
, and c =
AC_[10]
.
SKIP_
and
make corresponding changes in the other problems then the breaks will
disappear. Note carefully in the above that we have left a blank line between
the “QM_” and “AH_” tags since tags must not occur on consecutive lines. If we didn’t want to include that blank line
then we could do the following.
QM_[0;3;-5/6;95/12]
If ![]() is written in the form
is written in the form ![]() then
then
AH_
a =
AC_[5]
b =
AC_[5]
, and c =
AC_[10]
.
SKIP_
With
these edits the worksheet is saved and all of the “Posting” steps are repeated
(in about a minute) to produce the following:
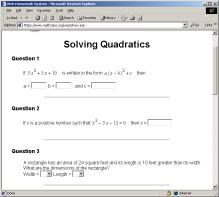
This
is better but the document is in need of additional enhancements (e.g. a
diagram in problem 3) which will be added as we proceed through subsequent
trips through the edit cycle.
Since
the editing process is both creative
and problem-solving there are few general rules to follow, save these:
Make
one change at a time. If you make a single change to a “working” resource and
“something breaks” then you know where to look for the problem.
Except
for text edits take the time to document changes through comments as to what has been done to
the worksheet
With
this simple example we have been through the major steps in creating and
posting a WHS resource.
More Details on WHS Formatting
The
previous introductory tutorial demonstrated only a two of the WHS answer
formats and control mechanisms. In what follows we describe the WHS authoring tools in more
detail.
The initial and global header sections ( H_ )
In a WHS document the
information in the input file (source document) which occurs before the first
occurrence of a line beginning with
"H_" is called the initial
section.
The initial section provides space for
comments on the document contents, macros, scratch calculations, etc. The initial section of the input file is
ignored by the WHS system.
The "H_" symbol marks the beginning of the part of the document
containing material which will be displayed. It is called the global header . It may take the extended form "H_[m]" or "H_[m;s]" where arguments
"m" and "s" are
non-negative integers.
"H_" is equivalent to
"H_[1]"
"H_[m]" is equivalent to "H_[m;1]".
The global header
"H_[m;s]" on a problem set with s +mk problems instructs the system
causes the system to display the first s problems in the set in order and then
to present in random order a random selection of k additional problems, one
from each group of m problems after the first s. If m > 1 this results in a different set of problems being
presented each time the assignment is displayed.
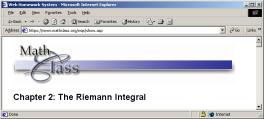
A typical global header section might be as follows. (The “SKIP_” is explained in the next section).
H_
Chapter 2: The Riemann
Integral
SKIP_
Sections in General
Except for the initial
one a section of a document consists of a control line together with the
text lines preceding the following control line. Two properties of
sections are important in understanding certain requirements on the form
of an input file:
a. All information on a control line
which follows the tag is ignored by the WHS system.
b. Empty sections are not permitted. (equivalently, one cannot have two
consecutive control lines)
Text Sections ( T_ )
A text section is one beginning with a control line whose tag is "T_"
. The contents of a text section may include graphics will be displayed as it
appears in the input file in the same relative position. Text sections can
provide space for introductory material for problems at one extreme and space
for entire text chapters at another. A typical text section might be:
T_
In the next three problems assume that you are on the moon. You may need to
look up the appropriate acceleration due to gravity at that location.
SKIP_
This would format as:

Skip Sections
(SKIP_)
A section beginning with a control line whose tag is "SKIP_"
will be ignored by the WHS system. They
provide space for comments and notes, calculations, etc. which make the source
document portable and possible to maintain.
SKIP_ sections are important delimiters in WHS documents.
The global header section, each text
section, and each problem must be
followed by skip sections. (This is
why we included the “SKIP_” lines in the
examples of global header and text sections, above).
Answer Header Sections (AH_ or AH_[n])
The AH_ tag preceding an answer header section instructs WHS to ignore or add html line breaks before and after the text in the section. A single parameter with value 0, 1, 2, or 3 can be specified by adding [x] after the AH_. The normal text lines are output and, if the parameter is specified and has value 1 or 3, then it is followed by a line break, i.e. <br/>. If the value is 2 or 3, then it is preceded by a line break. AH_[0] which is equivalent to AH_ instructs the system to ignore the line break terminating the final line of the section. This makes it possible to have answer boxes “inline”. Otherwise a <return> terminating the line just before an answer tag would force the answer box or menu it creates to always begin a line. The arguments 1,2, and 3 permit one to add spacing in order to set text off or display answer boxes or menus. The most common use is to force inline answers as in the example for Constant Answers, below. Note also the use of AH_[3] in the example illustrating the use of a textbox for Essay Responses, below.
WHS Problem Formats
Problems Requiring Answers: ( QM_ )
Sections beginning with a control line containing a tag
of the form QM_[a;b;c; ... ;z] are ones
for which answers are expected. The "M" stands for
"multiple" and indicates that a single problem can have multiple
answers in multiple formats. The first argument, "a" is the accuracy
to which a submitted numerical answer must approximate the correct answer.
Typical values are .001, .0001, and 0. The remaining arguments are, in
order, the correct responses (perhaps
to within "a") to each of the questions posed in the problem. There are five principal answer formats,
each corresponding to a particular tag.
a. Constant Answers
Constant Answers are numbers or character
strings. The numbers can take the form of any algebraic expression on might
enter into a scientific calculator using "calculator syntax" (i.e.
asterisks "*" are required to indicate multiplication and parenthesis
required to indicate functional values (e.g.
ln(6) rather than ln 6). "pi' and "e" can be used for
3.14159... and 2.718..., respectively.
The argument "x" indicates the width (in characters) of the text box
provided for the student answer.
An answer is deemed
correct if it is within the error bound "a" of the correct answer. If
the correct answer is a character string this requires that the submitted
answer perfectly match the given correct one (including spaces).
Here is a sample problem with two character answers:
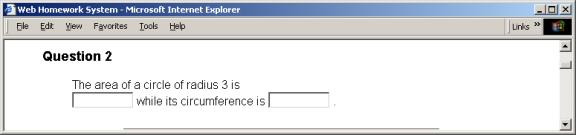
QM_[.001;pi*3^2;2*pi*3]
The area of a circle of radius 3 is
AC_[10]
while its circumference is
AC_[10]
.
SKIP_
This will create two text boxes into which the student
may enter his/her answers. As noted in
the previous tutorial the problem will not be in the form most would expect as
it would, in each case, place the text box on the next line. In order to force
the system to place the answer boxes inline one adds an Answer Header
Tag, AH_ as
indicated in the following. The tag instructs the WHS system to ignore the
<return> on the line immediately
preceding the next control line.
QM_[.001;pi*3^2;2*pi*3]
AH_
The area of a circle of radius 3 is
AC_[10]
while its circumference is
AC_[10]
.
SKIP_
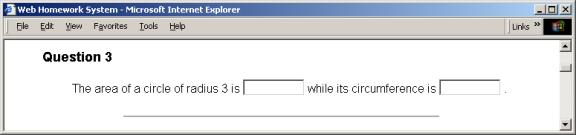
The blank line between the
"QM_" and "AH_" tags above is forced by the requirement
that no section be empty.
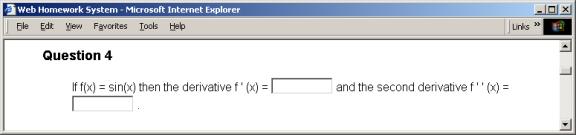
b. Function and Integral Answers: AF_[size;var;numpts;lorange,hirange]
Function
answers are
algebraic expressions in calculator syntax.
The answer provided in the argument line of the QM_ tag and the student
answer are both expected to be in calculator syntax and expressed in terms of
the single variable "var". The "size" argument declares the
length (in characters) of the text box for the answer. The system evaluates the difference between the
submitted and correct answer at "numpts" randomly selected points in
the interval (lorange,hirange) and declares the answer correct if the absolute
value of the difference is at most the tolerance, “a”, declared as the
first argument of the QM_ tag. The following is an example:
QM_[.001;cos(x);-sin(x)]
AH_
If f(x) = sin(x) then the derivative f
‘ (x) =
AF_[10;x;10;0;3]
and the second derivative f ‘
‘ (x)
=
AF_[10;x;10;0;3]
.
SKIP_
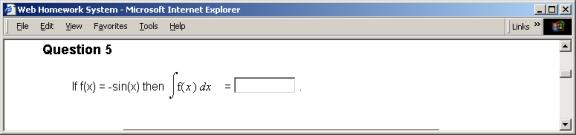
c. Integral Answers: AI_[size;var;numpts;lorange;hirange]
Integral
answers are
algebraic expressions in calculator syntax.
The form is identical to the function answer format (AF_)
with the only difference being the interpretation by the system. In this
case the system checks that the values of the submitted expression and those of
the correct answer agree to within the
stated precision up to an additive constant.
QM_[.001; cos(x)]
AH_
If f(x) = -sin(x) then ![]() =
=
AI_[10;x;10;0;3]
.
SKIP_
d. Selection Answers: AS_[choice_1;choice_2;…;choice_n]
Selection Answers are lists of alternatives provided
by a listbox. The system compares the string chosen from the list with the
answer given in the argument to the
QM_ tag. The answer is correct if the strings are identical. This is case
sensitive and includes spaces,
punctuation. An example is:
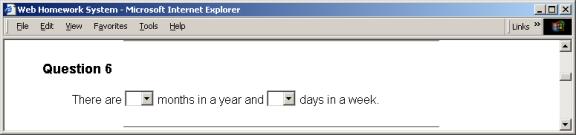
QM_[0;12;7]
AH_
There are
AS_[2;7;30;12;14;10]
months in a year and
AS_[2;7;30;12;14;10]
days in a week.
SKIP_
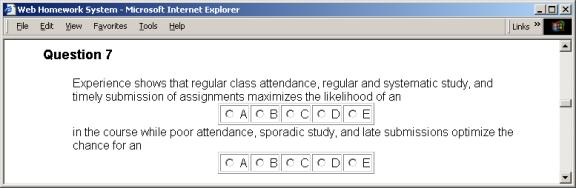
e. Multiple Choice Answers: AL_[label_1;label_2;…;label_n] and AR_[index]
The AL_ tag directs the placement of a line of “radio buttons” labeled
“label_1” through “label_n”. The most common labels are the letters A through
E. The labels typically reference choices for the answer to a question posed
in the section preceding the control line containing the AL_ tag. An example is:
QM_[0;A;E]
AH_
Experience shows that regular class attendance, regular and systematic study,
and timely submission of assignments maximizes the likelihood of an
AL_[A;B;C;D;E]
in the course while poor attendance, sporadic study, and late submissions
optimize the chance for an
AL_[A;B;C;D;E]
.
SKIP_
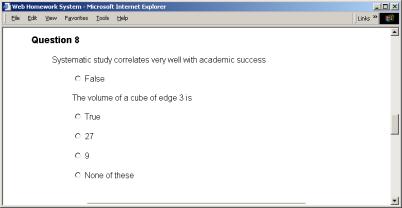
f. Row Answers: AR_[index]
Row answers are a multiple choice format which is
typically employed when the choices are large and/or complex. In this
format the answers are presented to the
right of a vertical row of radio buttons with the answer indicated by selection
of the button to the left of the correct choice. The correct answer is given on
the QM_ line as the number (starting with 1) of the correct answer.
The same problem can have several AR_ answer sets. The first group of answers occurs with the AR_[1] tag, the second with
AR_[2], etc. All tags of a smaller index must occur before any tags of a larger
one.
QM_[0;1;2]
Systematic study correlates very well with academic
success
AR_[1]
True
AR_[1]
False
The volume of a cube of edge 3 is
AR_[2]
9
AR_[2]
27
AR_[2]
None of these
SKIP_
g. Checkbox Answers: AB_[label_1;label_2;…;label_n;None of These]
An AB_ tag
directs the placement of a line of checkboxes labeled by the arguments to the
tag. The labels reference choices from among alternatives to answer a question
posed in the preceding section. Unlike the radio button choices for the AL
tag the correct answer is expected to
be the subset of the boxes selected. This is why the choice “None of these” or
its equivalent must be included in order to provided for the empty set as an
answer. The correct answer is indicated in the answer arguments to the QM_ tag
by placing the argument line sequence to the AB_ tag in the answer line of the
QM_ tag and deleting the choices which are not to be selected. An example is:
QM_[0;;1;;;4;;;;1;2;;4;5;]
Which of the integers
{0,1,2,3,4,5} are congruent to 1 mod 3?
AB_[0;1;2;3;4;5;none of these]
Which of these integers have squares which are congruent to 1 mod 3?
AB_[0;1;2;3;4;5;none of these]
SKIP_
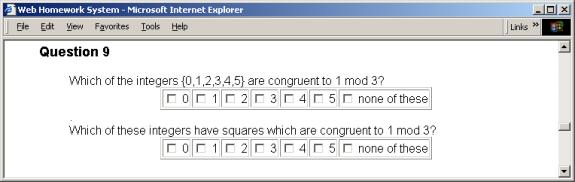
The simplest way to produce the QM-line argument for a checkbox answer is to first complete the AB- control line (e.g. “AB_[0;1;2;3;4;5;none of these]” as above). Then duplicate the argument for that line in the QM-tag in the corresponding position (e.g. “QM_[0;] -> QM_[0; 0;1;2;3;4;5;none of these]). Then delete the incorrect answers while retaining the semicolon to the right of each (e.g QM_[0; 0;1;2;3;4;5;none of these]-> QM_[0; ;1;;;4;;]).).
h. Word Answers: AW_[size]
Word answers provide for situations when the correct
answer is a character string but for which there is more than one correct
choice. A common example is when there
is more than one acceptable spelling. The argument for the AW_ tag itself is the size (in characters) of the answer
box to be provided. When the tag is used one places in the answer position in
the QM_ line a pound-sign (#)-separated sequence of acceptable answers.
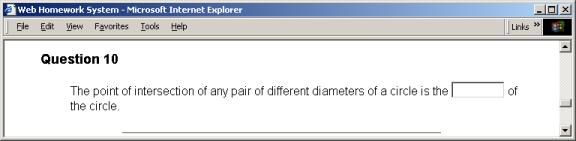
QM_[0;center#CENTER#Center#Centre#CENTRE]
AH_
The point of intersection of any pair of different
diameters of a circle is the
AW_[8]
of the circle.
SKIP_
It is important to note that the student answer must
match one of the choices in a word answer exactly. This includes
spaces and punctuation. Thus unless
this is understood from general instructions (e.g. in the header section) questions in this format should remind the
student of this requirement.
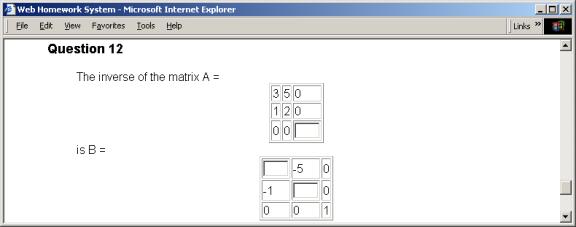
i. Tabular answers: AT_[ansbxsize;m;n;t11;t12;…..;tmn]
The tabular answer tag above creates a table of with m rows and n columns with t11 in the row1-column1 position, t12 in the row1-column1 position, …, tmn in the rowm-columnn position with the understanding that if tij (but not the semicolon preceeding it) is omitted then an answer box if size “ansbxsize” is placed in that position. The expected answers corresponding to these boxes appear in the QM-line in the order in which the entries occur on the AT-line. For example :
QM_[.01;1;2;3]
AH_
The inverse of the matrix A =
AT_[2;3;3;3;5;0;1;2;0;0;0;]
AH_
is B =
AT_[2;3;3;;-5;0;-1;;0;0;0;1]
.
SKIP_
Multiple Answer Formats in the Same Problem
The “M” in “QM_”
indicates multiple answer formats are possible in the same problem. Just as
each of the above examples contains more than one example of the particular
answer tag, the same problem can call
for any number of answers of any type. For example
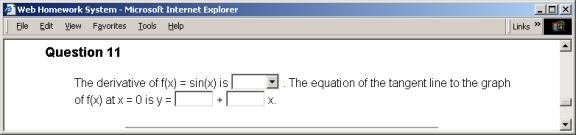
QM_[.001; sin(x);0;1]
AH_
The derivative of f(x) = sin(x) is
AS_[sin(x);-sin(x);cos(x);-cos(x);tan(x);sec(x)]
. The equation of the tangent line to the graph of f(x) at x = 0 is y =
AC_[5]
+
AC_[5]
x.
SKIP_
Problems Not Evaluated by WHS
Problems Not Requiring Answers: ( QN_ )
A section with
the tag "QN_ " on its control
line is a problem with no provision for the submission of an answer to the
machine. For instance:
QN_
Read Chapter 3 of the text and work
problems 1,3,5, and 12.
SKIP_

Here we have appended a minimal SKIP section to satisfy the requirement that
problems be followed by a SKIP section.
Problems For Which There is No Single Answer ( QN_[] )
Examples of
this
type could be
surveys or “essay” answers. In this
case one simply wants to record the
student responses and make them available to the teacher for subsequent
analysis. To have the system simply
record the student responses but otherwise do no processing one simply uses
“QN” where one previously used “QN”.
One otherwise uses exactly the same form as the “QM” format
and must provide accuracies and “correct” answers even though they
are not to be used. The “correct” answers need not make any sense.
They must be there for the system
consistency-checking to work.
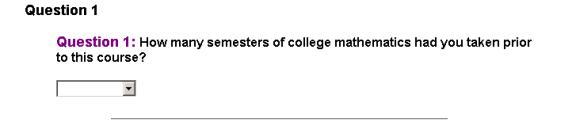
Example:
QN_[0;xxx]
Question
1: How many semesters of college
mathematics had you taken prior to this course?
AS_[0;1;2;3;4;5;6;7;8;9;10;
more than 10]
SKIP_
Note that simply by
changing the “M” on a “QM” question to
an “N” one can convert a
system-evaluated problem to one for which the responses are not evaluated but
are retained.
There is a special answer form, used only
with the QN_[] question format
which opens a text cell into which students can enter or paste text responses.
Multi-line text answers: AX_[n]
The AX_[n] answer tag opens a text box of n
rows by 40 columns in which the student can enter or paste a text answer. This
form is used only with questions of QN_ type.
Example
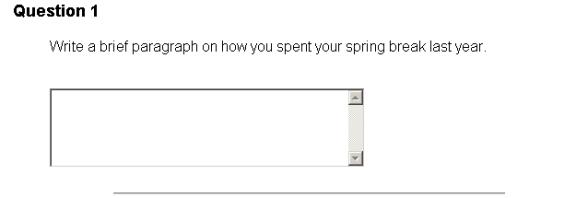
QN_[0;xyz]
Write a brief paragraph on how you spent your spring
break last year.
AH_[3]
AX_[5]
SKIP_
Suppression of Correct Answer Return: QM_N[]
The default behavior in WHS is to return the correct
answer whenever a student submits a response to a question. This will be partially suppressed if the character immediately following the
underscore is an upper case N. In this
case the correct answer is displayed only displayed when a correct answer is
submitted.
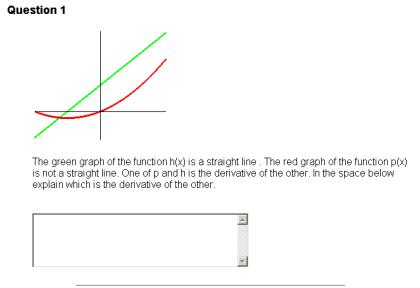
Inclusion of Graphics
WHS source documents are typically developed in word processing or problem solving environments which can be exported to html. If graphics are included in problems in WHS source documents they will be included in the html. For instance the following from a Maple source document produces the problem which follows.
QN_[0;xyz]
The green graph of the function
h(x) is a straight line . The red graph
of the function p(x) is not a straight
line. One of p and h is the derivative
of the other. In the space below explain which is the derivative of the other.
AH_[3]
AX_[5]
SKIP_
Other Formats
Since WHS in continuously under development new tags appear and old ones are extended on
a regular basis. For instance there is
an answer format (the QA_ form) through which
authors can create specialized answer formats. The most recent author documentation can
be found at the Author Documentation link